Kenriko 46 Out of 5 Stars 31 Reviews Kenriko Tesla Model 3 Matrix Black
If yous determine to buy a Tesla, any Tesla, delight consider using my Referral Code: https://ts.la/doug93556. You'll get a US$100 Supercharger credit and I'll get something, likewise. Thanks!
The carpeting material in the Tesla Model 3 premium interior is rather flimsy. Information technology doesn't have the feeling of a cloth that volition hold up to much wear and use. And so I went on the chase for flooring mats and settled on two sources.
For the passenger-compartment floors (front end and rear) I selected the 3D MAXpider mats for US$205. In that location was (and currently still is) a look, just I did receive them within the timeframe I was quoted.
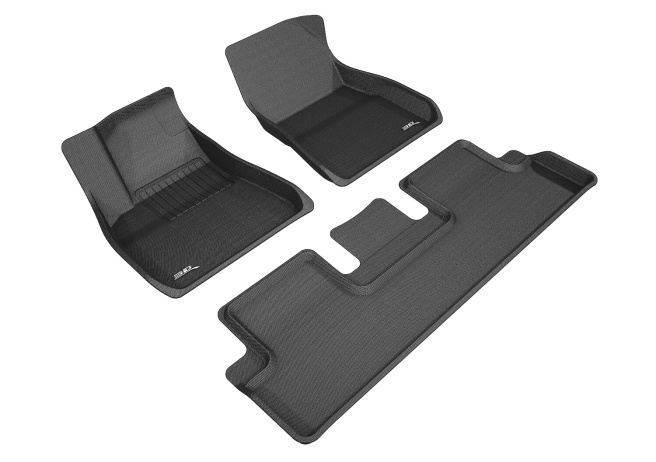
These mats aren't plush. They're adequately difficult condom, textured and sculpted to fit perfectly and with raised edges so the mats can really constrain clay and liquids. They're very lightweight and stiff, so you tin easily lift them out to simply hose them off. I didn't similar the "3D" logos, and then I (easily) removed them, although that leaves a dimple in the material. I prefer that to the glossy logos. I like these fifty-fifty more than than I expected.
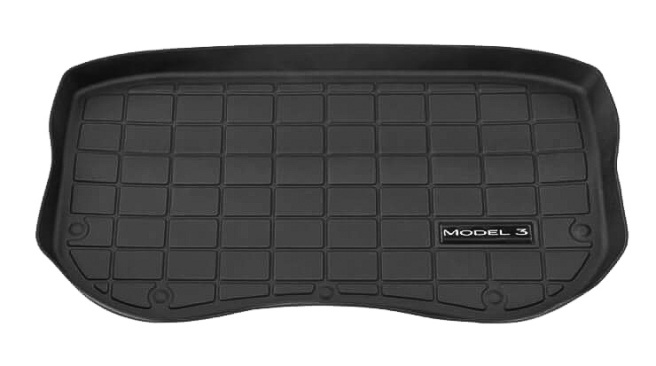
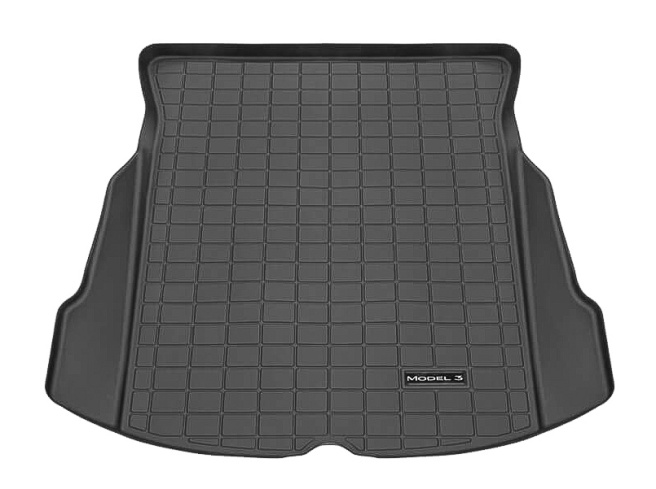
For the trunk and frunk, I decided to purchase the Tesla mats for U.s.a.$130 and U.s.$70, respectively. Like the MAXpider mats, these accept raised edges and are lightweight and easily removable. For some reason, these Model 3 logos didn't bother me, so I've left them on. The trunk mat has a notch for the loop that allows you to easily elevator the hatch covering the deep storage well in the rear.
Both sets of mats are highly recommended. United states$409 full, plus taxes and aircraft (if whatever).
As much every bit I love my new Tesla Model iii, at that place are a few cosmetic things that cried out for modifications. And given that I wasn't able to even drive the car for its offset two months due to an injury, I spent much of that fourth dimension making various "improvements". Many of the mods are in the form of vinyl wraps, described below.
I searched the internets for options and finally settled on the vinyl-wrap kits from Kenriko, sold on Amazon.com. He's a guy with a day task, and then in that location are some delays in his updating Amazon's inventory as well equally fleshing out the options such as different materials (matte black, carbon fiber, etc.). The kits arevery reasonably priced, all beneath Usa$30. Kenriko is very active (and responsive) on the Tesla Motors Club forum.
Center Panel
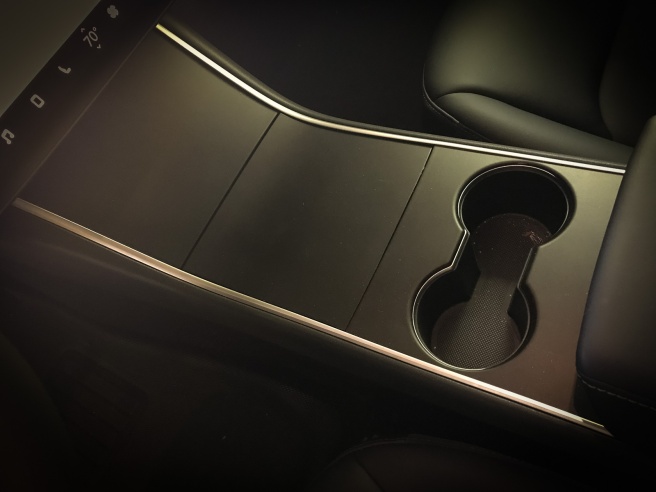
I began with the heart console. Similar almost everyone I've spoken to, I found the stock glossy black finish to be a disaster. It shows every fingerprint, scratch and speck of grit. I considered carbon fiber and other vinyls, but ended up going with Kenriko's Avery 900 Matte Black kit. (See his installation video.) Why the Avery matte black? Kenriko says (and he'due south correct) that the 3M M12 Matte Black scratches very easily. The Avery production (in this particular case) is more durable. But my main reason is that it looks and so skilful with the dark Alcantara upholstery. Information technology's a DIY wrap, just I cheated. I had Juan Gomez install information technology when he wrapped the outside of the machine. Juan does a much improve job of this than I practise.
Door Switches
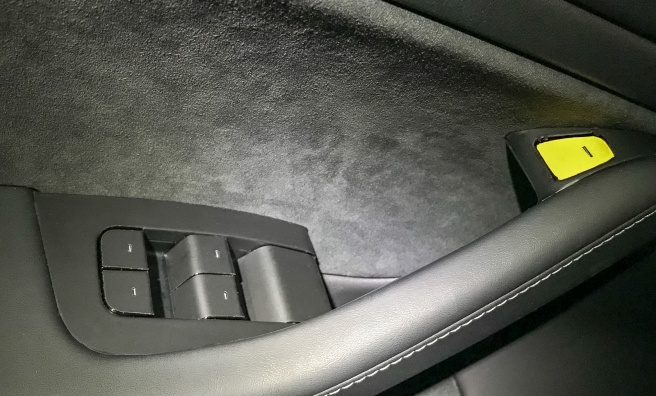
Later getting the car back from Juan, I decided to tackle the door switches myself. For this one, I bought Kenriko's 3M 1080 Matte Black kit. (Installation video.) Yeah, I know I just wrote that 3M Matte Black scratches, merely information technology seems okay on the door switches, which aren't as vulnerable or obvious as the heart panel. After installing the wrap, I decided to swap out Kenriko's door-open buttons for glossy yellow vinyl. I originally hand-cut the pieces using Kenriko's originals equally templates. More than on this later on. (Original post with more info at https://goo.gl/c7Kuva.)
My Own Vinyl Cutter
Not only does Kenriko sell kits on Amazon.com, he also uploads free, open-source templates to github in both .ai (Adobe Illustrator) and PDF formats. You can hands download the PDF versions and and so hand-cut your ain materials, but some of the cuts are small and tricky. For best results, you'll want a truthful vinyl cutter. Also consider that the toll of the vinyl is almost as much as ownership one of Kenriko's complete kits, so if you can live with the materials he offers, you're better off merely purchasing his kits.
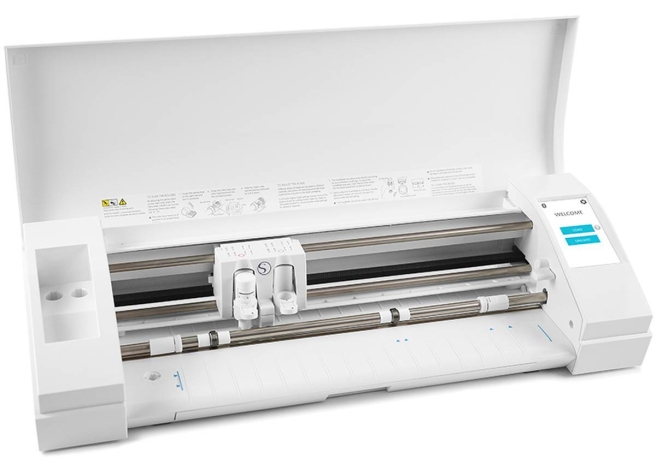
I decided I wanted to practise more than of this blazon of modification, and then I decided to dive into the world of vinyl cutters. Afterward a chip of enquiry, I settled on a Silhouette Cameo 3 cutter. Yes, I know US$200+, plus the materials — I could do all of this for far less by simply buying kits. But hey…I didn't say any of this was rational!
I then purchased a diversity of vinyls including:
- 3M 1080 G83 Gloss Night Cherry-red
- 3M 1080 BR212 Brushed Black Metallic
- 3M 1080 MX12 Matrix Blackness
The standard Silhouette Studio software, which is free with the cutter, won't open Adobe Illustrator or PDF files. For that, I upgraded to the Designer Edition. That's United states$49.99 if purchased from Silhouette, but I discovered you tin can buy it from Swing Design for The states$xx less. The PDF files piece of work fine as-is, but at the time I wanted to tackle the next projection (door sills), Kenriko had only uploaded the Adobe Illustrator file to github.
Not wanting to pay monthly for Adobe Illustrator, I downloaded the free, open up-source app, Inkscape instead. For my iMac, this also required X11, and then I downloaded and installed XQuartz. At showtime, I tried opening the .ai files in Inkscape and saving equally SVG files, then opening those in Silhouette Studio. That resulted in some scaling errors. Instead, I ended up exporting to PDF from Inkscape and opening the PDFs in Silhouette. Scaling correct!
One of my outset self-cut projects was to supplant the footling yellow door-opening buttons (come across above) with ones that have cleaner edges.
Door Sills
Armed with my trusty Cameo three, I was ready to tackle the next projection: door sills. Kenriko did the difficult part, designing a template to cover the forepart-door sills with cutouts for the "MODEL iii" text. But I wanted 2 things he didn't offer: Matrix Black vinyl — Carbon Fiber is more popular, but I like the matrix look improve — and ruby-red lettering.
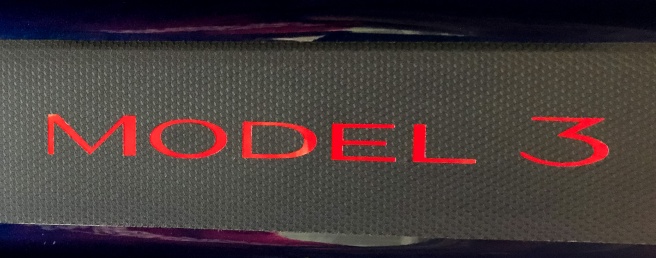
I downloaded Kenriko's template in Adobe Illustrator format. I then made two versions: One simply every bit Kenriko fabricated it for the Matrix Black overlay, and another for the Gloss Night Red vinyl that covers the full expanse only is simply a bit undersized: about 2mm all around. I exported both in PDF format, opened them in Silhouette Studio, then cut the vinyl. The Matrix Blackness is quite a bit thicker and tougher than the red vinyl, so I had to run a few tests to go the settings right.
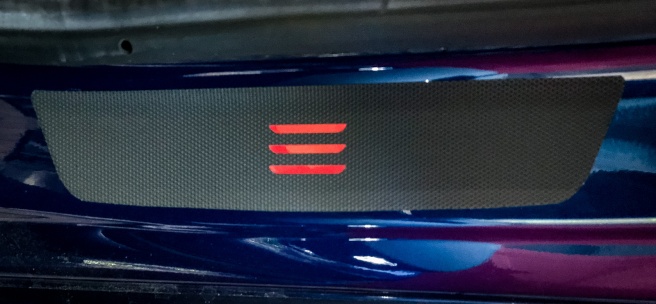
No, at that place isn't commonly a door-sill plate on the rear doors. This is a Kenriko "extra".
What'southward Next?
I've got at least two more wraps in the works: I desire to embrace the wood dashboard strip in Matrix Black and portions of the steering wheel in Matte Black, like the center console. I plan to wait for Kenriko to upload templates for these mods, since he does all that piece of work with more than intendance and patience than I'yard probable to use. I program to update this post once I've got those done.
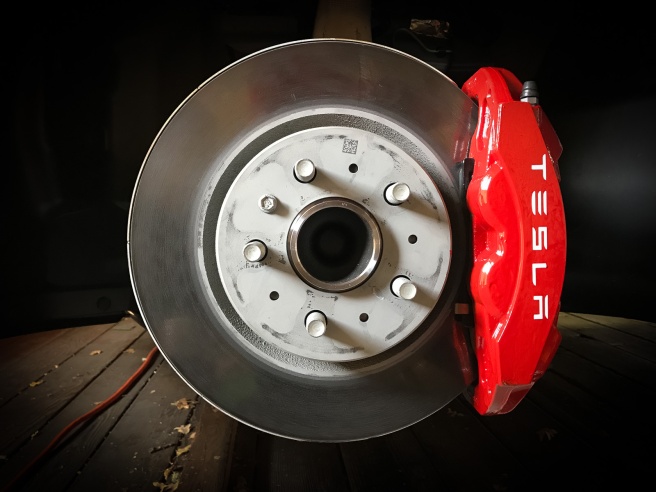
I've e'er liked the look of vivid red brake calipers backside good-looking wheels. Even before I got my Tesla Model iii, I knew I wanted red calipers. I researched the options and found these:
- Unplugged Functioning offers a complete replacement for rotors and calipers for $9,000. Beyond my upkeep.
- T Sportline in the Los Angeles area will paint them for you lot for $1,200. Still more than I wanted to pay. And I don't live most L.A.
- EVANNEX sells a set of ruddy caliper "covers" for $290. They look okay, but it's a weird way to get the results. And fifty-fifty notwithstanding a scrap pricey.
- ForMyTesla.com offers a DIY kit of epoxy paint and decals for $79. Now nosotros're talking! (Their website is a mess. As of writing this, I could only become at that place via ForMyMercedes.com since the ForMyTesla.com link wasn't working at all in my browser. Others don't seem to have a trouble with it however.) Annotation that if you lot don't want the "Tesla" decals, yous tin purchase the exact same kit for 1/ii the price at many places.
Needless to say, I went with the least expensive option.
Of course, whatever project similar this is nothing more than an excuse to buy tools, and in this case the tools cost well more than than the project itself. In my case, I needed the following to do the project. All simply the concluding were found at the local Harbor Freight store:
- 21mm socket with 1/2″ drive – $3.99
- Billow bar to remove the lug nuts – $12.99
- Torque wrench, up to 129 foot-pounds – $19.99
- 3-ton depression-profile hydraulic floor jack – $129.99
- Wheel chocks – $7.99
- Jack adapter – $35. If the URL doesn't work, search eBay for "Tesla Model 3 Jack Pad Adapter Elevator Signal Pad".
Total for the project: $288.18 plus aircraft and sales tax. Aforementioned price as the EVANNEX option and I stop upwards with (a) amend results, and (b) tools I will use in the futurity.
The jack adapter is very important. At that place are only 4 specific points at which you lot tin jack upwards your Tesla Model 3 unless you want to start removing panels from beneath the car to expose suspension points at which you tin can support the ii-ton vehicle. Even then, those would be the "unofficial" points at which to lift the car. Plus, without a total elevator or jack stands, I prefer not to work underneath a jacked-upward machine. You might be able to lift the auto from one corner high enough to place a jack stand nether the other point on the same side, but even so I'd need four jack stands and iii more than adapters. Then I decided to do one bike at a time.
Here are the steps I took:
- Chocked the wheels on the opposite side.
- Used the breaker bar to loosen the lug nuts.
- Jacked up one wheel using the adapter.
- Removed the cycle.
- Used the spray cleaner provided with the paint kit to clean the caliper.
- Masked off areas non to be painted such as the deejay, pads, dust cover, etc.
- Mixed 1/iv of the red paint and the epoxy "activator" using disposable eye droppers and a paper cup, neither of which are included with the kit, which is designed to be mixed and used all at in one case. You tin employ it for two hours before information technology cures.
- Painted a starting time glaze using a dispensable 1″ foam-rubber brush (the kit includes just one brush).
- Waited xv minutes, then applied a 2nd coat.
- Waited two hours, then installed the decal.
- Sprayed a protective coating (to continue the decal from rubbing off during washing) using some stuff I had in the house.
- Reinstalled the wheel.
- Waited 24 hours before driving.
The jack adapter has a magnet that holds information technology in place to the frame of the car. That's bang-up, simply information technology'southward also like shooting fish in a barrel to forget about it later on you lower the car. I solved this by attaching it to the jack using a piece of string so that when I remove the jack, the adapter always comes off with it.
[Annotation: I think the jack adaptor is a great matter to continue in your car in case you need roadside service, etc.]
The kit from ForMyTesla.com was excellent. Good quality materials, good instructions and a fair price.
Because of the two-hour expect before re-mounting the wheels, this takes eight hours, plus the 24-hr look before driving. Or spread it out over two days similar I did. It's actually less than one hour of work time per caliper.
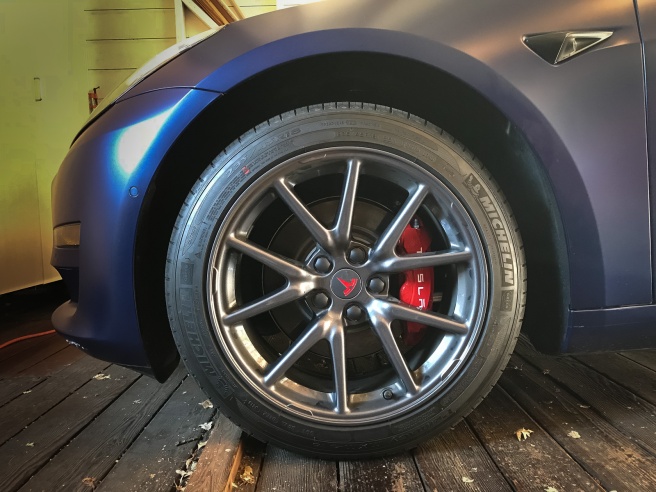
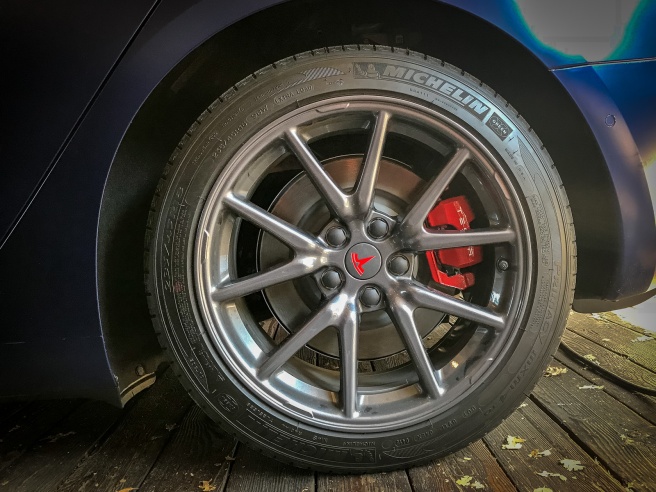
Oh yeah…what about that red logo on the bike hub? Offset of all, these are the standard eighteen″ wheels with the aero covers removed. I added Tesla'southward Aero Wheel Cap Kit for $50. And so I finished it off with the ruby-red T-logo decals from Tesla Pride ($9.75 from Amazon.com).
The Tesla Model iii comes with a bracket for attaching a front end license plate. Information technology's a simple gadget you affix to the front end of the machine using an agglutinative. There's just one problem: the auto has very prissy forepart-end lines that are ruined by attaching the plate. At to the lowest degree in my stance and those of many others.
Here in California, a front license plate is required. You tin get a "set up-it ticket" for $114. Supposedly — I haven't tried it — y'all can then attach your plate, accept it to the DMV (or possibly whatever local police department) have them inspect the vehicle, and have the ticket reduced to $20. From what I hear, about of these tickets are issued by parking-meter patrols.
I'm not planning to permanently adhere my front plate, so to prepare for receiving such ticket(s), I went looking for the best removable forepart license-plate frame. Here are some I establish:
- The Law. $134.99 from Torklift Central (or at a higher price from elsewhere). It'south "designed for no-touch on carwash simply", which is probably true for most or all of these options. My #1 concern is that the plate is mounted in forepart of the grille. And while the Model 3 doesn't have a traditional (engine) cooling arrangement, it does have a radiator and coolant system for the main batteries and MCU (calculator).
- Sto n Sho. $94.99 from Big Mikes Operation Parts. I liked the cost and the fact that the plate is so easy to remove. All the same it requires drilling into the underside of the bumper encompass (not too big a deal), only also that information technology extends well-nigh an inch beneath that bumper cover. I'chiliad already scraping the ground when I drive into my garage. This would make that much worse. Plus, like The Law, this subclass blocks the grille.
- Platypus. $93.00 from CravenSpeed. This is a pretty expert solution. The plate is easily removable and when on, it doesn't block the air intake. It looks a little weird, being mounted off to the side. Just if your goal is but to attach the plate for the sake of an inspection, this might be the best (and to the lowest degree expensive) option. The Platypus attaches to the tow-commodities, which on the Model 3 is on the far-left (commuter'southward) side of the grille. CravenSpeed claims it blocks neither the cooling nor the ultrasonic sensors. And it has a quick-release feature. Merely did I mention that it looks a little weird?
- Evannex. $99.95 from Evannex, who as well sells The Law, just at a higher price than Torklift Key. This is a very unproblematic device. Information technology uses agglutinative to attach to the front bumper embrace, only like The Police force and the Sto north Show frame, this one blocks the grille. Some other no-go for me.
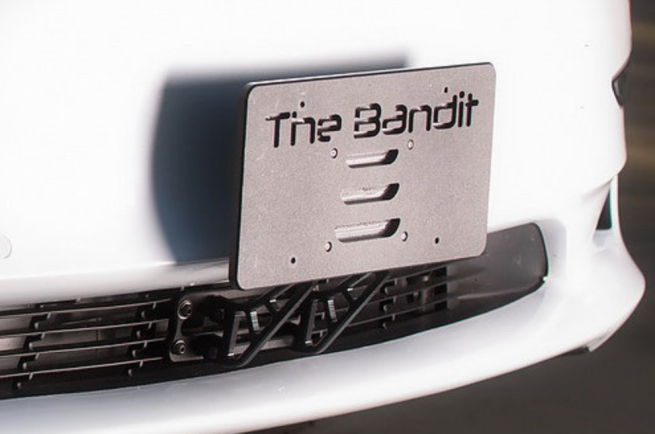
- The Brigand. $119.00 from 1975 Creations. This is the one I ended upward buying and and then far, I'g glad I did. Starting time of all, The Bandit doesn't block the grille or any sensors. It bolts onto the grille, but has arms that reach upwards, positioning the plate above the grille in the same position as Tesla's own adhesive mount. 2nd, it's centered and then it doesn't expect weird. Third, it's removable, although not as easily equally The Law, Sto n Show or the Platypus. Still, it's easy enough to remove and replace and I capeesh the quality of the CNC-machined materials, the quality of the attachment hardware and the abyss of the bundle including tools.
In that location are a diversity of financial incentives to buying an electrical vehicle (EV) in general and a Tesla in particular. [This is a US- and California-centric mail.]
Federal Tax Credit
The U.S. federal authorities and a number of states offering financial incentives, including taxation credits, for lowering the up-front costs of plug-in electric vehicles (EVs).
The federal Internal Revenue Service (IRS) taxation credit is for $2,500 to $7,500 per new EV purchased for utilise in the U.S. The size of the taxation credit depends on the size of the vehicle and its bombardment chapters. A 2018 Long-Range Tesla Model three qualifies for the maximum $7,500 credit. (To find out specific revenue enhancement credit amounts for individual vehicles, visit FuelEconomy.gov's Tax Credits for Electric Vehicles and Tax Credits for Plug-in Hybrids pages.)
This tax credit is bachelor until 200,000 qualified EVs have been sold in the United states by each manufacturer, at which signal the credit begins to stage out for that manufacturer. Tesla has merely recently shipped their 200,00th car, and according to Electrek.co, Tesla buyers will lose the full $vii,500 credit by the finish of 2018 unless the law is changed, hitting $3750 for the offset half of 2019 and $1875 in the second half of 2019.
To claim the credit, fill out IRS Grade 8936, Qualified Plug-in Electric Drive Motor Vehicle Credit. For vehicles acquired for personal employ, study the credit from Form 8936 on the appropriate line of your Form 1040, U.Southward. Individual Income Revenue enhancement Return. For vehicles purchased in 2010 or later, this credit can exist used toward the alternative minimum tax (AMT). To learn more about the law, visit the IRS's Plug-in Electric Drive Vehicle Credit webpage.
CAV Decals and HOV Lane Usage
The California Clean Air Vehicle (CAV) plan authorizes a qualifying vehicle that meets specified emissions standards to be issued a CAV decal to allow single occupancy use of High Occupancy Vehicle (HOV or carpool) lanes. The fee for a clean air vehicle decal is $22. Utilise for your stickers from the DMV.
The California DMV is now issuing a new carmine decal for all qualifying vehicles that volition be valid until January 1, 2022. For a vehicle purchased on or after Jan i, 2018, the DMV cannot consequence a CAV decal to an applicant who has received a consumer rebate through the Clean Vehicle Rebate Projection (CVRP), below.
Make clean Vehicle Rebate Program (CVRP)
California residents may besides quality for a $2,500 rebate under the Clean Vehicle Rebate Programme (CVRP), depending upon the blazon of vehicle and your annual income.
Depending on your income, you may not qualify for the CVRP or y'all may have to choose between the CVRP rebate and the CAV decals. For EVs (as opposed to fuel-cell vehicles) if you're to a higher place the income limit, CAV decals are your only selection. An applicant whose gross almanac income is in a higher place specified thresholds must cull between a CAV decal or a CVRP rebate.(See Question #six in the FAQs.) The income limits are
- 150,000 for single filers
- $204,000 for head-of-household
- $300,000 for joint filers
PG&E Clean Fuel Rebate
Pacific Gas & Electric as well offers a $500 rebate if yous buy or charter a new EV. The application procedure is simple and the rebate checks arrive within merely a few weeks.
Those CAV Decals!
The federal $vii,500 revenue enhancement credit (which you lot merits on your next-yr tax filing) and the $500 PG&Eastward rebate are no brainers. If you're beneath the income limits, you'll have to cull between the $2,500 California rebate or the CAV decals.
Where I live in the San Francisco Bay Expanse, CAV decals are of questionable value. The HOV lanes are usually every bit crowded as the non-express lanes due to carpoolers, EVs and scofflaws. But at that place's something almost preserving the option that makes the CAV decals "nice to have". The problem is that they're peculiarly ugly and you accept to employ four of them in a multifariousness of specific locations on your vehicle. For a car like mine, where I've modified the end, removed logos, blackened the chrome, etc., it's a real shame to mess up the await of the car with decals. Bright cherry-red stickers on a very patently, matte bluish car? Nah, I don't think so!
The folks at RPMTesla, and others, take come upwards with a pretty adept compromise solution. Rather than adhere the CAV Decals directly to your pigment or (in my case) vinyl wrap, you tin use the decals to pre-cut pieces of clear vinyl, which y'all and then apply to your car. This fashion, you can remove the decals at whatsoever time without dissentious either the decals or the auto (or wrap) and even re-apply the decals later. The kit from RPMTesla costs only $19.00 plus shipping. ($24 total to California.)
Personally, I've purchased the RPMTesla kit and the CAV decals, but I have however to put them on the car. Non sure if I will or not. At to the lowest degree I have that selection. I've also received the $500 PG&E rebate and volition utilize for the total $7,500 federal tex credit on my 2018 tax returns. Together, these bring the toll of my car from $56,000 down to only $48,000 plus tax and license fees.
On March 31, 2016, I went to the local Tesla store to plunk down a $one,000 eolith on the long-anticipated Model 3. No one had seen one, let alone driven 1. There was a line out the door and downward the street and I presently learned it wasn't moving much. There were probably 100+ people in front of me, so I left, went dwelling, and made my eolith from home afterwards that evening. I was probably more than than #100,000 of the 180,000 who gave deposits in those offset 24 hours, so I figured I'd exist waiting a while.
In March 2018, 24 months after all those Day I deposits, it looked similar Tesla was getting set to deliver Model 3s to new customers. They had been slowly delivering cars to some employees and existing owners of other models for the previous vi months or so. Hoping I'd get to configure my auto soon, I rented a Model 3 for 24 hours from a Tesla employee via Turo. My wife and I ran some errands and put about 100 miles on it. The car was everything I'd hoped for.
26 months after paying the eolith, and after checking the Tesla website many times each solar day, I discovered I could now configure my motorcar. Of course I'd been planning my configuration for some time, and I was pleased to detect that my chosen config was identical to the offset version of the car Tesla was producing. It would exist the but configuration (except for color, wheels, interior and autopilot options) available for the showtime iii months.
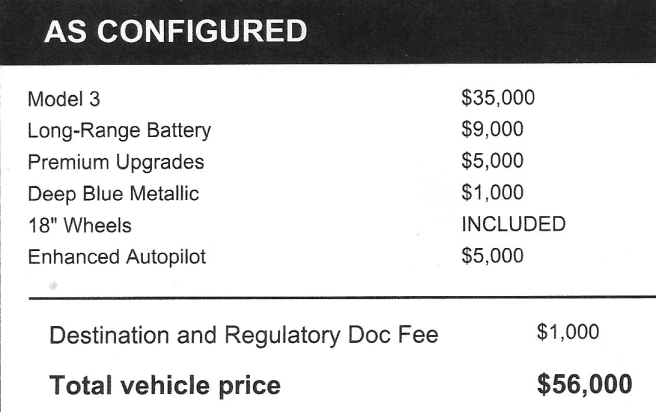
You can meet the config from the delivery sticker.
- Basic Model three with Rear Cycle Unmarried-Motor Bulldoze (standard). 0-60mph in well-nigh five seconds. $35,000
- Long-Range Battery. 310 miles vs. 220miles for the standard battery. $ix,000 upgrade.
- Premium Upgrades. Ability, heated seats; heart console; premium audio system (fantabulous!), tinted glass roof; dimming/folding/heated side mirrors; commuter profiles; LED fog lamps. $5,000 packet.
- Deep Blueish Metallic paint. An extra $i,000 for those shiny picayune flakes.
- 18″ Standard Wheels with the removable Aero covers.
- Enhanced Autopilot. $five,000. Doesn't include the future Full Self-Driving Adequacy, but does include (today!) Auto Lane Change, Autosteer (stay in lane), Traffic-Enlightened Cruise Command (great for terminate-and-go traffic), Autopark (parallel and back-in) and Summon (in and out of the garage, for example).
- Total $56,000 plus tax and license.
Then what didn't I get?
- Total Self-Driving Capability. Information technology'due south a $3,000 increment, or pay $5,000 to update at a later date. This is a "future" feature. It doesn't exist even so. Given the complexity of the job and all of Tesla's many delays, I effigy I might not still own the motorcar by the time they offer this. So I opted out at this time.
- Dual-Motor All-Wheel Drive. 0-60mph in virtually 4.5 seconds. $four,000 increment. I don't need to drive in snowfall, mud, etc.
- "Performance" Dual-Motor All-Wheel Drive. 0-60mph in three.five seconds. A $fifteen,000 upgrade over the base of operations price or $11,000 more than the non-performance AWD version. I had driven a bones rented Model 3 ii months prior, so I knew the bones car was plenty fast enough for me.
- 19″ Sport Wheels. $ane,500 upgrade. The standard 18″ wheels offering a smoother ride. Also, I similar the looks of both the standard Aero covers as well as the standard wheel that's underneath if you remove the Aeros.
- Premium White Interior. $1,500 upgrade. White? Really?
And what do I recollect after three months (although absolutely, I nevertheless haven't driven my ain car)?
I'm quite happy with the choices I made. The but 1 I fifty-fifty question is the $9,000 long-range bombardment. That'southward a big chunk of change, particularly considering that the 220-mile bombardment would probably be just fine for me except for four-6 days per year when I might make a long trip to Oregon or Southern California. That standard bombardment still isn't supposed to be available for another half dozen-9 months (ie, 2019Q1 or Q2), and since my old car (a Lexus 450X) was totaled in May, I'd take had to purchase something else in the meantime. All things considered, I'm very happy to take the long-range batteries.
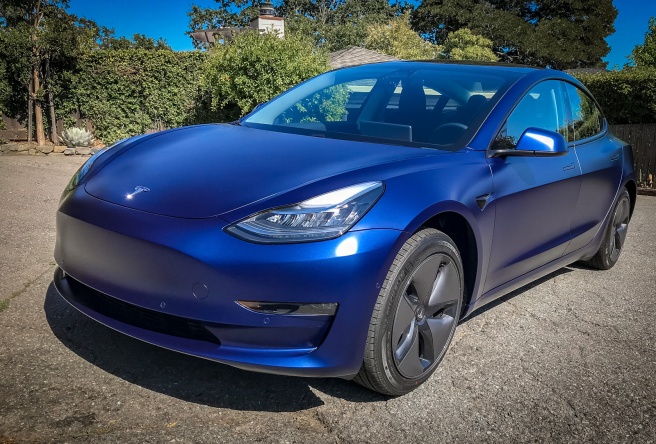 My 2018 Tesla Model iii
It'south been more than two years since my last web log postal service. So why now? And why Tesla? The short answer is that while stuck at domicile recovering from a nasty automobile accident, I've learned (and continue to learn) quite a bit about the new Tesla Model 3. I have pages upon pages of notes that I've decided to re-purpose equally an ongoing series of blog posts and manufactures.
The detailed introduction…
With the rapid growth of social media, the popularity of blogging has steadily waned. 2 years agone, all my posts were about photography. Occasionally, I posted a long-form article about something I'd learned, simply about of the posts were in conjunction with my YouTube and audio podcast photography gear reviews, first on All About the Gear (on the TWiP network) and then with Gordon Laing on the Cameralabs Photography podcast. Over fourth dimension, YouTube became increasingly important, and interest in the blog versions of my reviews — really not much more than links to YouTube — slowly faded. And also, I've been so decorated with the reviews and with teaching photography, Lightroom and Photoshop, I didn't have much to say.
For the past three months, my wife and I take been recovering from a head-on motorcar crash. Our injuries were quite serious: broken necks, broken sternums, broken ribs and (in my wife'due south instance) a badly broken wrist. The accident was May 4, 2018. I'm still confined to a cervical collar and my wife's wrist is still in a cast. Bottom line: although we're healing, neither of us can drive so we're remarkably homebound and getting bored and grumpy. But we're seeing the light at the terminate of the tunnel. My demand to do something probably encouraged my return to blogging.
Okay, then back to Teslas…
On March 31, 2016 I, like many others, put downwardly a $one,000 deposit on a Tesla Model iii. I had previously driven a Model S and even had a deposit on a Model X. But I was never happy plenty with either of these cars to buy one. Sight-unseen, however, I was pretty sure the Model iii would exist the right car for me. So I waited. And waited.
Knowing that I'd presently exist able to place an society or request a eolith refund, I rented a local Model 3 in March via Turo. No way I was going to order a new auto without having driven 1 and Tesla had no demo cars for test drives. I loved it and placed a firm order as soon as Tesla notified me I could. So I waited.
Our blow was May 4. 8 days later I was released from the hospital, only was told I'd be in the neckband and out-of-commission for at least 12 weeks. Sure plenty, but two weeks after getting home I got the call from Tesla. "Your auto is ready. You and your wife must both sign the documents and you need to pick information technology up here in Fremont [lx miles away] in two days. Otherwise, you'll forfeit your deposit and lose your place in line."
I explained our state of affairs — we could barely walk — and said at that place was no mode we could be in Fremont in two days. The rep said he'd become dorsum to me. I posted our dilemma on social media, where a few thousand people read about information technology and hundreds left comments.
The next twenty-four hours, the rep called with the news that his managing director had a change of heart. Instead of our traveling to Fremont, Tesla would now deliver the car to me, at my dwelling house and my wife didn't have to sign the documents later all. "How'southward tomorrow?"
On May 30, 2018 I took delivery of a gorgeous Deep Metal Blue Tesla Model 3 with 66 miles on the odometer. The Tesla employee who delivered it, took Uber back to Fremont.
If you've ever been stuck at home for an extended menses for health reasons, but been in pretty adept shape overall, you know how bored and broken-hearted you lot become. I can't go places without rides from friends, Uber or Lyft and because we alive atop a hill that's too steep and long for me to walk upward, I'l relegated to sitting at home in forepart of screens. And yous know what that means: web browsing and shopping!
The Model 3 is sitting in the garage with simply 247 miles on it (none of them driven by me) after 2 months. But it hasn't been neglected. The auto has been wrapped in vinyl, ceramic coated, outfitted with a fancy new front end/rear dashcam and more often than not been adorned with almost every possible aftermarket add-on from decals and "performance" pedal covers to floor mats. The but thing that has saved me so far is that the car is relatively new and a lot of aftermarket accessories oasis't been released yet. If it'southward available, I've probably bought one.
In the blog posts to follow I will document some of the many things I've learned about the Tesla Model 3. There'due south nil new here, simply I hope to nowadays it topic-by-topic with plenty of links to other sites so that these blog posts become a valuable resource for you and for me. Promise you enjoy it.
Source: https://blogarithms.com/tag/model-3/
0 Response to "Kenriko 46 Out of 5 Stars 31 Reviews Kenriko Tesla Model 3 Matrix Black"
Post a Comment